Walk-jog progression after Achilles rupture is the bridge between rebuilding calf strength and running again. It is one of the biggest milestones in rehabilitation — but it should never be based on the calendar alone.
Running loads the Achilles tendon far more than walking. A structured walk-to-run plan gives the healing tendon time to adapt to repeated impact before you ask it to handle continuous jogging or longer distances.
Contents
- Key takeaways
- Criteria before you start walk-jog training
- Why walk-jog beats jumping straight back to running
- The phased walk-jog programme
- Sample walk-jog interval progression
- Important rules during walk-jog training
- When to progress, pause, or step back
- What this means for your recovery
- Frequently asked questions
- References
Key takeaways
- Do not start running on a date alone. Clear functional criteria first.
- A common strength benchmark is 25+ high-quality single-leg heel raises.
- You also need pain-free walking, good balance, normal stairs, and no limp.
- A typical pathway is: fast walking → walk-jog intervals → short continuous runs.
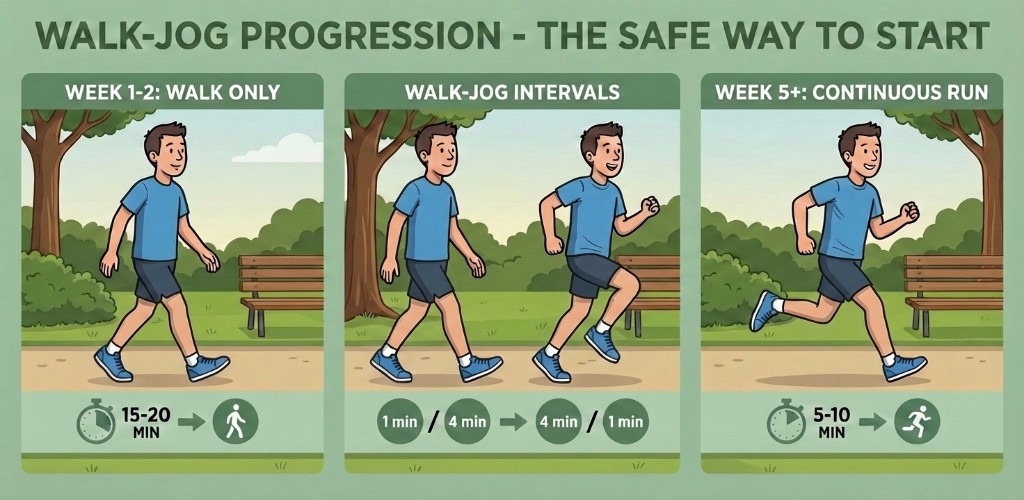
- Many programmes use weeks 1–2 for walking only, weeks 3–4 for intervals, then short continuous runs from week 5+.
- Start on flat, predictable surfaces and keep stride length short at first.
- Progress only if pain and swelling stay calm during and after each session.
- A safe return to running is about tendon capacity, not confidence alone.
Criteria before you start walk-jog training
Before your first jog, your leg needs to show it can handle higher loads than everyday walking. Clinicians look for objective signs that the calf-Achilles unit is ready — not just that you feel keen to run.
| Prerequisite | What “passing” usually looks like | Why it matters |
|---|---|---|
| 25+ single-leg heel raises | Repeated reps with good heel height and control | Tests calf endurance and tendon push-off capacity |
| Pain-free baseline | Walking, stairs, and daily movement without Achilles pain | Shows basic load tolerance before impact |
| Normal gait | Heel-to-toe walking with no visible limp | Limping under load often gets worse with jogging |
| Good balance and control | Stable single-leg stance and controlled squats | Reduces sloppy mechanics when fatigue sets in |
| Normal stair function | Up and down stairs with confidence and symmetry | Stairs are a useful bridge between walking and running load |
| Clinician clearance | Surgeon or physiotherapist agrees you are ready | Accounts for surgery type, gap, healing, and your goals |
These match Thetis clinical guidance: return to running is criteria-based, with 25+ heel raises as a gold-standard target. Timing is secondary.
If you are not there yet, work through single-leg heel raise progression and functional milestones first. Needing more time is normal — rushing this stage is one of the most common causes of setback.
Why walk-jog beats jumping straight back to running
Walking and running are not just different speeds. Running introduces higher peak forces, faster loading rates, and more repeated stretch-shortening cycles through the Achilles.
A walk-jog programme lets you:
- Reintroduce impact in small, measurable doses
- Practice landing and push-off mechanics before continuous running
- Watch how the tendon responds over 24–48 hours after each session
- Build aerobic fitness without asking for a full run on day one
Major sports-medicine centres use interval walk-jog plans for this reason. The Massachusetts General Hospital Achilles protocol, for example, progresses through repeated walk-jog cycles — such as 5 minutes walking and 1 minute jogging — before moving to continuous jogging.
In practice, the transition back to running is often less about confidence and more about tendon capacity. Strong foundations reduce unnecessary risk later.
The phased walk-jog programme
The exact timetable varies between hospitals, but the logic is consistent: walk first, jog in intervals second, run continuously third.
| Phase | Typical timing | What to do | Session guide |
|---|---|---|---|
| Phase 1: Walk only | Weeks 1–2 | Brisk walking on flat ground | 15–20 minutes at a purposeful pace |
| Phase 2: Walk-jog intervals | Weeks 3–4 | Alternate easy jogging with walking | Start with short jogs and longer walks |
| Phase 3: Short continuous run | Week 5+ | Steady easy jogging without walk breaks | 5–10 minutes at a controlled pace |
This is a guide, not a race. Some patients need longer in each phase. Others move faster — but only when symptoms stay calm and their clinician agrees.
Phase 1: Fast walking only (weeks 1–2)
The goal is not fitness heroics. It is to rebuild walking mechanics, rhythm, and tendon tolerance on predictable ground.
- Walk at a brisk, purposeful pace — not a stroll
- Aim for 15–20 minutes on flat surfaces
- Use a track, treadmill, or smooth path
- Keep posture upright and steps controlled
- Stop if pain or swelling increases during or after the walk
If fast walking still causes a limp or next-day flare, you are not ready for jogging yet.
Phase 2: Walk-jog intervals (weeks 3–4)
This is where impact returns in measured doses. Jog slowly. The pace should feel easy — conversational, not strained.
A common starting pattern:
- 1 minute jog / 4 minutes walk, repeated 4–5 times
- Progress toward 2–3 minutes jog / 2–3 minutes walk
- Later move toward 4 minutes jog / 1 minute walk
Only advance the ratio when the current stage is tolerated without flare.
Phase 3: Short continuous running (week 5+)
Once intervals are comfortable, try a short continuous jog — often around 5–10 minutes at first.
Do not add distance and speed in the same week. Build minutes first. Keep the effort easy. This phase is about tendon tolerance, not personal bests.
For running form and surface choice beyond the basic programme, see return to running after Achilles rupture.
Sample walk-jog interval progression
Protocols differ, but many follow the same pattern: gradually shift the balance from walking to jogging.
| Stage | Jog | Walk | Repeats | Notes |
|---|---|---|---|---|
| Level 1 | 30 seconds | 4 minutes | 4–5 | Very gentle reintroduction |
| Level 2 | 1 minute | 4 minutes | 4–5 | Common starting point |
| Level 3 | 2 minutes | 3 minutes | 4–5 | More jogging, still controlled |
| Level 4 | 3 minutes | 2 minutes | 4–5 | Tendon adapting to longer jog blocks |
| Level 5 | 4 minutes | 1 minute | 4–5 | Near-continuous load |
| Level 6 | 5–10 minutes | None | 1 | Short continuous easy run |
Some programmes, including models based on Adams and colleagues, add no more than two levels per week and require at least one rest day between sessions early on. The MGH protocol similarly states: only progress if there is no pain or swelling during or after the run.
If your hospital gives you a different sheet, follow that. These tables show the logic behind most plans.
Important rules during walk-jog training
A walk-jog plan only works if you respect the loading rules around it.
| Rule | What it means in practice |
|---|---|
| Flat surfaces first | Treadmill, track, level grass, or smooth paths |
| Short stride early | Keep feet under your body; avoid overstriding |
| Easy pace only | Jog slowly; no sprinting or racing |
| One variable at a time | Change duration, frequency, or surface — not all three together |
| Rest days matter | Alternate run days with low-load or non-impact work |
| Watch the next 24–48 hours | Pain, swelling, stiffness, and limp after a session guide the next step |
Before running is cleared, low-impact cardio such as pool walking or cycling can help fitness without the same tendon demand.
Avoid early on:
- Hills and cambered roads
- Uneven trails
- Sudden jumps in weekly distance
- Speed work, fartlek sessions, or intervals for performance
Tendons adapt best to consistent, controlled loading — not sudden spikes in activity.
When to progress, pause, or step back
Use symptoms as your guide. A little stiffness after a new stage can be normal. Sharp pain, swelling, or a worse limp is not.
Green light to progress when:
- Pain stays mild or absent during the session
- No new swelling around the tendon or ankle
- Gait feels normal the next day
- Morning stiffness is not clearly worse
- Heel raises and stairs still feel solid in the days after
Yellow light — repeat the same stage when:
- Mild soreness appears but settles within 24 hours
- You felt tired or rushed but mechanics were okay
- Confidence was lower than usual
Red light — stop and contact your clinician when:
- Sharp Achilles pain during or after the session
- New swelling or a worse limp the next day
- Clearly worse morning stiffness after running
- Reduced heel-raise quality in the following days
- A sudden pop, snap, or loss of push-off
Whole-leg swelling up to the knee, calf pain, breathlessness, or chest pain should prompt medical review even if it seems unrelated to the ankle, because of clot risk after Achilles rupture.
For broader late-stage risk reduction, see preventing re-rupture after recovery.
What this means for your recovery
Starting a walk-jog programme is a real milestone. It means your calf and tendon have rebuilt enough capacity to begin handling impact again — but the first weeks are a loading experiment, not a fitness chase.
Build the foundation before the first jog. Walk with purpose. Add short, easy intervals. Only then move to continuous running. And treat pain and swelling as useful feedback, not something to push through.
Return to sport — cutting, sprinting, and competition — comes later, with additional criteria such as hopping symmetry and confidence under load. Walk-jog training is one step on that pathway, not the finish line.
Work through this with your physiotherapist or surgeon. Protocols vary by country, treatment type, and activity level. For structured phase-by-phase guidance, see the Achilles recovery course and the Achilles rupture rehabilitation FAQ.
Frequently asked questions
What is a walk-jog progression after Achilles rupture?
A walk-jog progression is a structured return-to-running plan that starts with fast walking, then adds short jogging intervals, and only later moves to continuous running. The goal is to let the tendon adapt to impact loading gradually.
What criteria do I need before starting walk-jog intervals?
Most teams want 25+ single-leg heel raises, pain-free walking without a limp, good balance, normal stair function, and clinician clearance. Return to running should be criteria-based, not based on the calendar alone.
How long does the walk-jog phase take after Achilles rupture?
Many programmes take around 4–6 weeks to move from fast walking through walk-jog intervals to short continuous runs, but timing varies. Progress only when pain and swelling stay calm.
What walk-jog ratio should I start with?
A common starting point is 1 minute of easy jogging followed by 4 minutes of walking, repeated several times. Ratios such as 1:4 or 2:3 are typical early on before continuous jogging.
When should I stop or go back a stage in walk-jog training?
Step back if you get sharp Achilles pain, new swelling, a worse limp the next day, or clearly worse morning stiffness. Mild soreness that settles within 24 hours may mean you repeat the same stage rather than progress.
References
- Rehabilitation Protocol for Achilles Rupture Repair — Return to Running Program. Massachusetts General Hospital Sports Physical Therapy. 2021.
- Silbernagel KG, Carmont MR, Grävare Silbernagel K. Rehabilitation and Return to Sports after Achilles Tendon Repair. International Journal of Sports Physical Therapy. 2023.
- Guidelines for Post-operative Rehabilitation following Achilles Tendon Repair. Mackay Clinic / Adams-based running progression. 2019.
- Rehab Practice Guidelines for Achilles Tendon Repair. University of Delaware. 2017.
- Silbernagel KG, Nilsson-Helander K, Thomee R, et al. A new measurement of heel-rise endurance with the ability to detect functional deficits in patients with Achilles tendon rupture. Knee Surgery, Sports Traumatology, Arthroscopy. 2010.
Primary source: Massachusetts General Hospital Sports Physical Therapy. Rehabilitation Protocol for Achilles Rupture Repair — Return to Running Program